
What is the difference between a visit to the ER and routine checkups at the doctor’s office?
While the former gets you immediate help in severe cases, the latter significantly minimizes your chances of ending up in an unpleasant situation.
When it comes to search engine optimization and your search presence in general, your website’s health is no different from that of a human being.
If you keep doing routine checkups, it will stay alive and well for a long time. And once you start ignoring its general well-being, you can run into emergencies way earlier than you expect.
This is where Google Search Console comes in.
Google Search Console is the doctor that performs routine checkups to keep your website in optimal health and prevent any potential SEO emergencies.
This post will show you some of the best and easiest ways to use Google Search Console for your website’s health so you can minimize risks in the long term.
What is Google Search Console?
Google search console (formerly known as Google Webmaster Tools) is a set of free webmaster tools and resources by Google that help you monitor your website’s health and presence in search results. These tools analyze data sets and inform you about potential dangers with ways to eliminate them. They also provide other useful information to help you keep your website alive and kicking in search results.
Technically, integrating the Google search console does not have a direct impact on your website rankings. However, it does indirectly help you gain better rankings in SERPs.
Integration of Google Search Console on Your website
The first step in getting acquainted with Google Webmaster Tools and using it for your site is integration. (Duh!)
Here’s how to do it in 3 simple steps.
Step 1: Google Webmaster Tools Login
Create a Google account and sign in to Google Search Console.
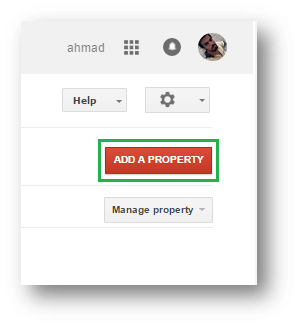
Step 2: Add a Property (your website)
Once you sign in, you will see a red button saying “ADD A PROPERTY” on the right side of your screen. Click that button.
A popup will appear asking for the property you want to add. Here you can add a website, a sub-domain, a directory, or the URL of an Android application.
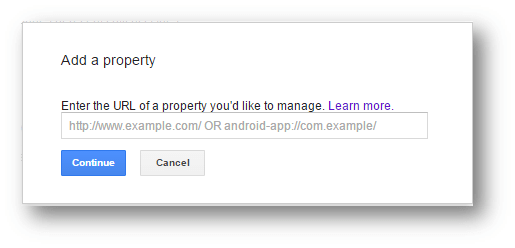
Important:
If you are adding a website, make sure you enter the correct version of its HTT protocol. For example,
- If your website is under HTTP, put the URL http://www.example.com, and
- If your website is under HTTPs, put the URL https://www.example.com
Remember: If you enter the wrong http version, it will still verify your property. But, you won’t see any data in the webmaster panel.
Step 3: Verify the Ownership of Property
Next step is to verify the ownership of the property you want to integrate with Google Search Console.
You will see two sections on this page, namely “Recommended method” and “Alternative method”. These are the two ways for going about your property verification.
1. Recommended Method: This option lets you verify by logging into the domain name provider’s panel e.g. goDaddy.com.
You will see a list of domain name providers in this section. Select yours and follow the steps explained on that page.
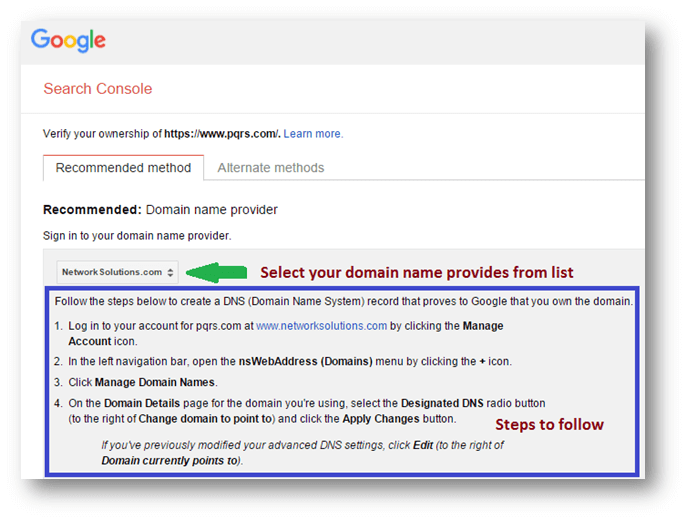
This method can be a little complicated sometimes. If that’s the case with you, go for option no. 2.
2. Alternative Method: Under this section, you will see multiple options to verify your website. Select the one that suits you best.
Once you have followed all the instructions, click the “Verify” button.
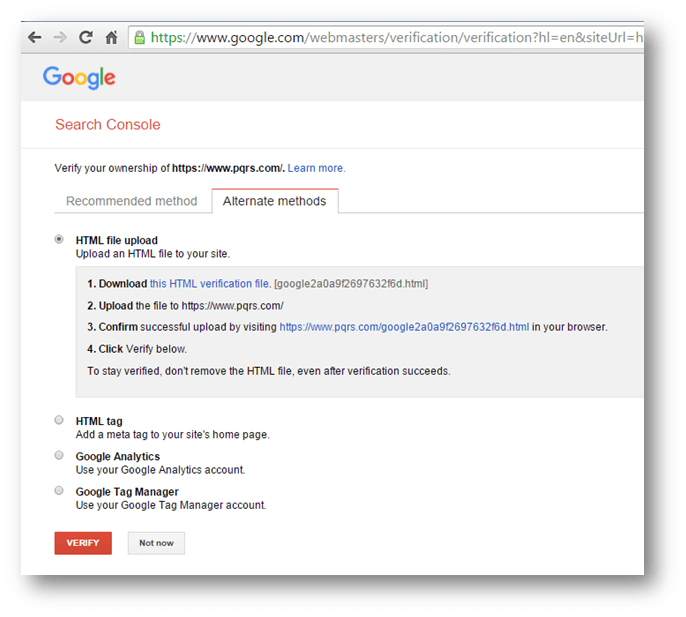
If you have followed all the steps properly, you will see the following page.

Congratulations! Google Search Console has been integrated into your site.
(I know, I know. It’s an emotional moment for you.)
Now, let’s find out how you can perform health checkups on your site with the help of this doctor.
Salient Features of Google Webmaster Tools
Google WMT has a lot of features that help you outperform your competitors in search results. Explaining all of them in one post would not be possible.
So, here are the important ones, sorted in top-to-bottom order based on my personal experience as a website owner and SEO expert.
Fetch as Google
Top of all, fetch as Google, is a feature that allows your webpage and its content to be instantly indexed by Google. This feature is best for indexing individual pages. When a webpage is fetched, you can see it in Google cache within minutes after submitting the request.
Here’s how to use this feature.
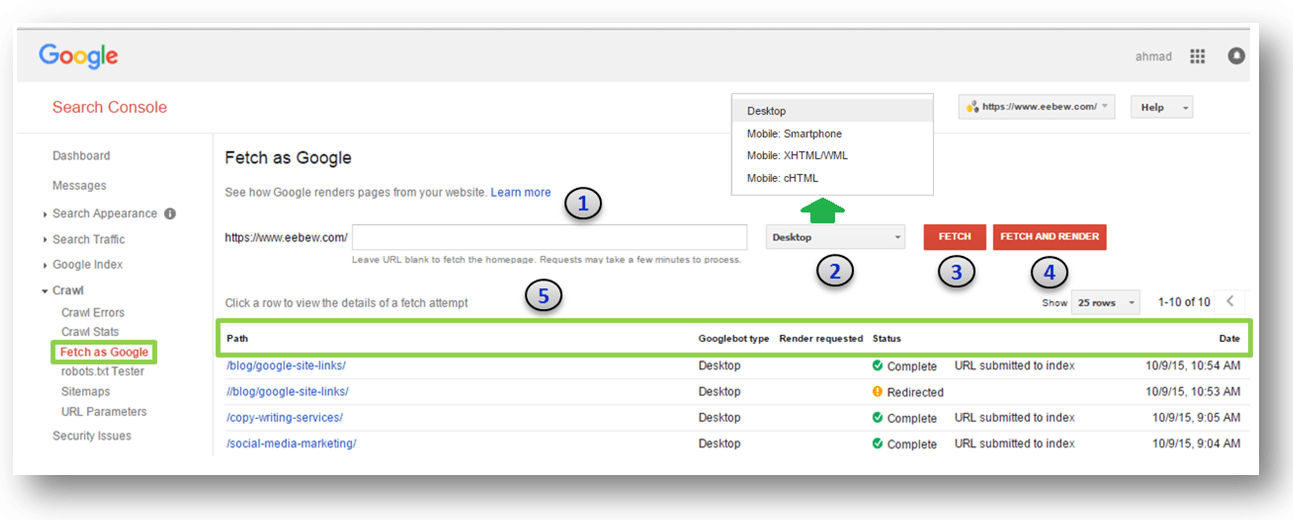
- Enter the URL of the page you want to be indexed in the respective field. Here, you’ll only need to enter a partial URL because you’ll see your domain URL already written before the field. For example, if you want to enter the URL https://www.example.com/abc/def/this-webpage, you’ll only need to write /abc/def/this-webpage in the field.
- Select the platform you want this webpage to be indexed for. Select one option from Desktop, Mobile: Smartphone, Mobile: XHTML/WML and Mobile: cHTML.
- After you click this button, it will fetch data from the URL and store it in Google databases.
- Next, it will show you how Google reads your webpage.
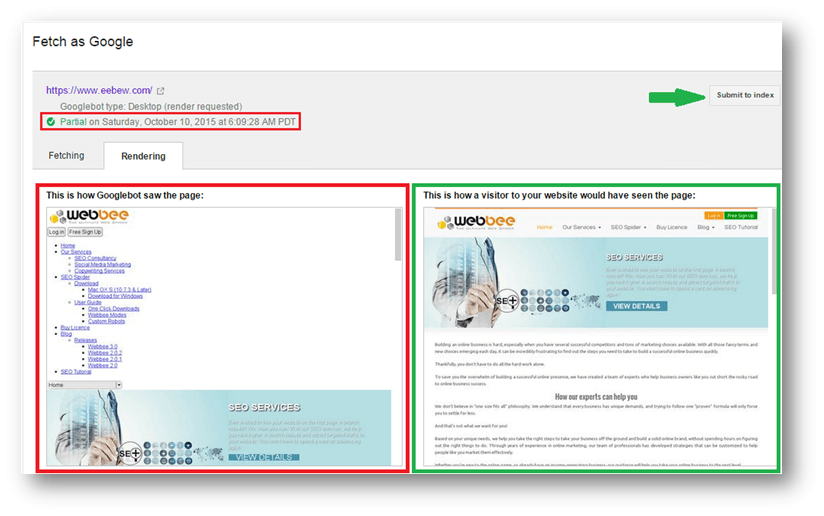
- The little red box on the top shows that the rendering was partial. This means that Google was unable to fully render your webpage.
- In the two boxes underneath, you can clearly see that the version of the webpage that users see is different from the version of the webpage that Google sees. There might be some .css or .js files that are not crawl-able by bots if they are disallowed in robots.txt.
- Finally, if you think everything is fine in the rendered results, use the button at the top right to submit this webpage to the index.
It shows the status of requested submissions.
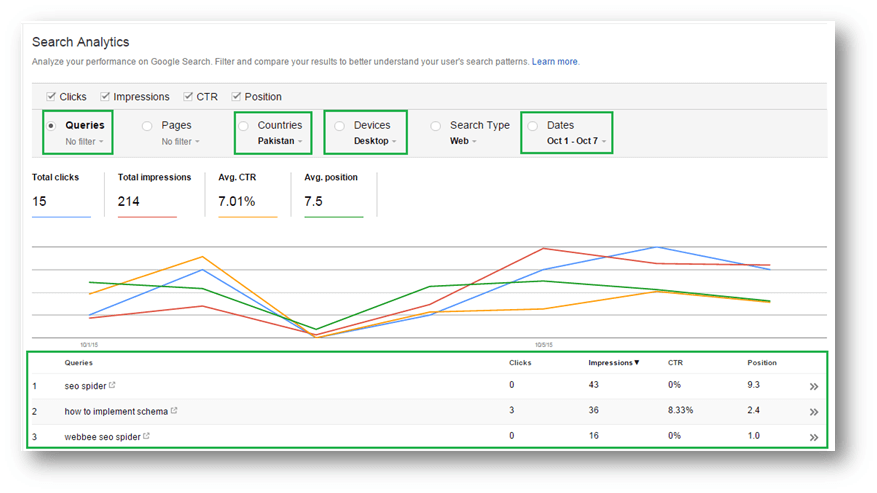
Search Analytics
Fully dedicated to the search results, this section allows you to analyze the search performance of your website from different angles.
When your webpages start appearing in search results, this section gives you full insights about which web pages are appearing in SERPs with which queries and at which positions.
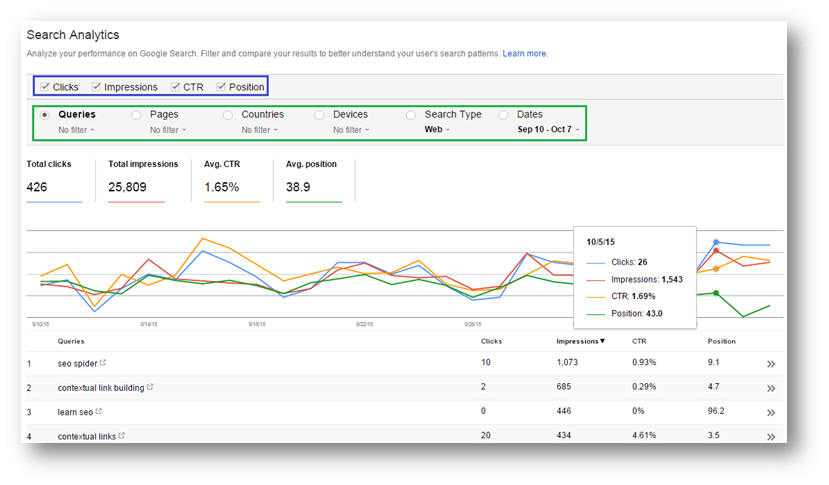
- In the image above, the items in the blue box show search performance. Whereas, the items in the green box are filters you can add to search performance items (blue box) to narrow down the analysis.
Here is a breakdown of all the filters:
- Queries: These are the search terms (typically known as keywords) that users type to reach specific information.
- Impressions: These are the occurrences of your webpages in search results against user queries. For every query, Google shows 100 pages with 10 results on each page i.e. 1000 results for each user query. So, no matter if your webpage appears in 1st position or the last, one appearance will count as one impression.
- Clicks: These are the number of times people clicked on your webpages in SERPs and landed on your website.
- CTR (Click through Rate): This ratio represents the percentage (%) of your impressions that send users to your website i.e. (clicks/impressions)*100. A 50% CTR means that from every 2 impressions, your website is getting 1 visitor.
- Avg. Position: This is the position where your website is/was appearing in search results for queries.
- Filters: These filters (Queries, Pages, and Countries, etc.) allow you to reach specific data sets for analysis. For example, my target market is Pakistan, and I want to see keyword performance in search results in the last seven days for Desktop users who searched through Google’s website.
These were my results…
Search Analytics Hack: 9 – 15 Analysis
Here, I want to talk about 9-15 analysis that can be performed using data from search analytics to improve a website’s presence in search results. This can also result in increased traffic.
What is 9 – 15 Analysis?
As I mentioned earlier, Google shows 10 results per page. Studies say that the results at the bottom of a page have minimal chances of getting clicks, and so do the results on the next page.
The term “9–15” focuses on keywords ranking between 9th and 15th position and pushes them on the first page of Google with some smart efforts.
Here’s how you can perform the 9-5 analysis:
- Separate this range of queries from data in terms of clicks, impressions and CTR.
- Clean the keywords, i.e, remove quotes (“) and other punctuation marks.
- Add another KPI (Key Performance Index) i.e. keyword searches from Google Keyword Planner.
- Sort them from top to bottom on the basis of keyword searches i.e. keywords with higher searches on top.
- Separate keywords with zero searches and save them in another sheet. Now, you have two data sets. One having keywords with searches and the other having keywords without searches. What’s common between both data sets is that they both are ranking between 9th and 15th positions in Google.
- For the first data set, i.e, keywords with searches;
- Use these keywords in titles and h1 (if keywords used in title and h1 are not ranking).
- Add internal links using them as anchor texts. Internal links in the form of contextual links are the best.
- Put some external links as well.
- Mention them in content on relevant webpages.
- If a webpage has images, use them in alt text for those images.
- Now, for the second data set, i.e, keywords with zero searches;
- Although these keywords do not have searches in keyword planner, they are still appearing in Google search console. This means that people search for them but not often. So, optimizing them can produce some results. To reap those benefits, use them in your content or as anchor texts in internal links.
These changes won’t take a lot of time or effort but they can go a long way in improving your search engine rankings.
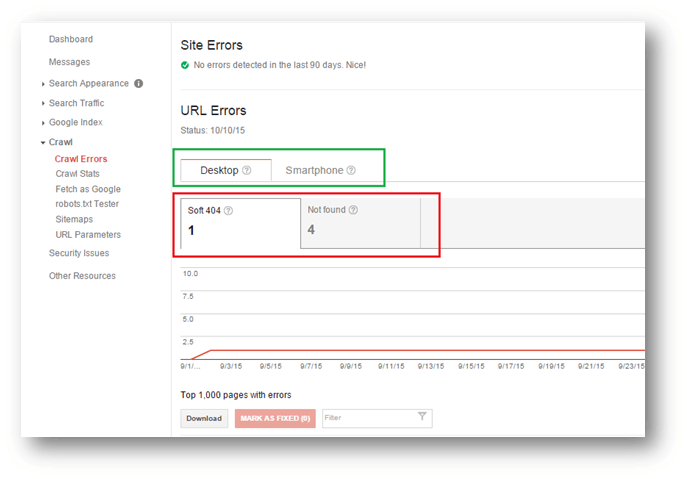
Crawl Errors
Next in our queue are crawl errors. Google reports 3 types of errors;
- Soft 404s: These are the errors when a resource does not exist on the server but, to entertain visitors, it is wrapped with a custom page with a 200 status code. Or a message “Page not found” is displayed on the page without throwing a proper 404 server status code. Google treats such pages as soft 404s.
- Not Found Pages: These are the actual not found URLs that properly throw 404 server status codes.
- Server Errors: These are the errors encountered by Google bot while fetching resources from the server when server or some of its services were not responding e.g. 503, 500 etc. Luckily, we don’t have servers in our case.
How to Deal with Crawl Errors?
- For server errors, ensure a 100% up server time.
- For soft 404s, try to throw a proper 404 server status code for both, the users and the search engine bots.
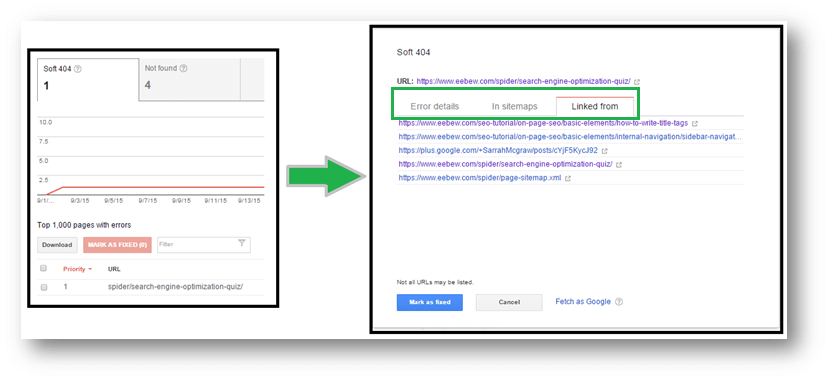
- Regarding not found pages reported in Google Web Master Tools, check;
- If they are linked with any external and/or internal resource. If so, redirect them to the most relevant webpage available on your website, other than the home page. After redirection, remove their internal links, too.
- If they are only internally linked, remove their internal links. 404 pages should not be linked from any internal resource.
- If they are available in sitemap, remove them from there.
- Read more on How to find Broken Links & How to Fix Broken Links.
You can check the above cases by clicking the reported URL in WMT crawl errors section.
Important Note!
Google does not crawl ‘not found’ pages when a 404 status code is being thrown by server. Such pages are not indexed as well. A soft 404, which throws ‘200 status code’, indicates a live page and ends up being indexed by Google.
As Google spends definite time on every website for indexing purposes, we waste some of its time with soft 404s while this time could have been utilized for finding and indexing new and unique webpages on our website.
Moreover, we have often seen webmasters write a code in their .htaccess file which redirects every non-existing resource to the home or other custom page. As per Google’s guidelines, this practice is also problematic and should be avoided.
Routine Check Ups in Google Webmaster Tools
We have covered a majority of Google Search Console’s most useful features. Let’s now talk about how you can use it for routine website health checkups.
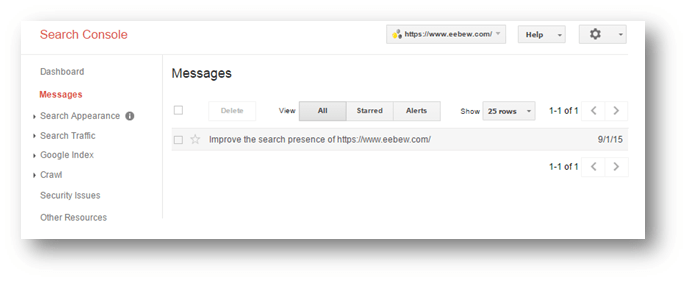
WMT Message Center
Just below the dashboard, you can see the WMT message center. Google uses this section to tell webmasters about their website’s performance. Any potential threats to the website or other informational messages are reported here.
So, it can be a good practice to check this section on a regular basis.
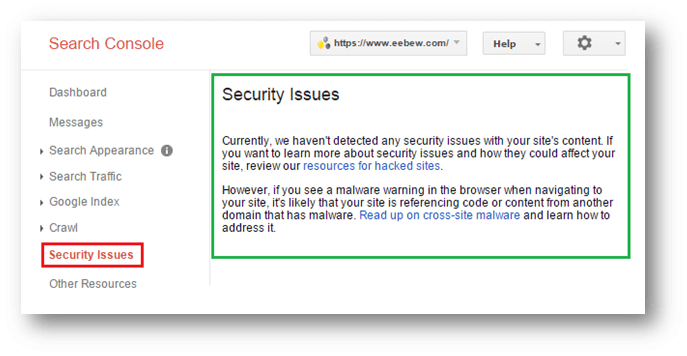
Security Issues
This is a splendid feature by Google Search Console. It reports potential security threats that can disturb your website’s search presence. Don’t forget to check this section on a daily basis.
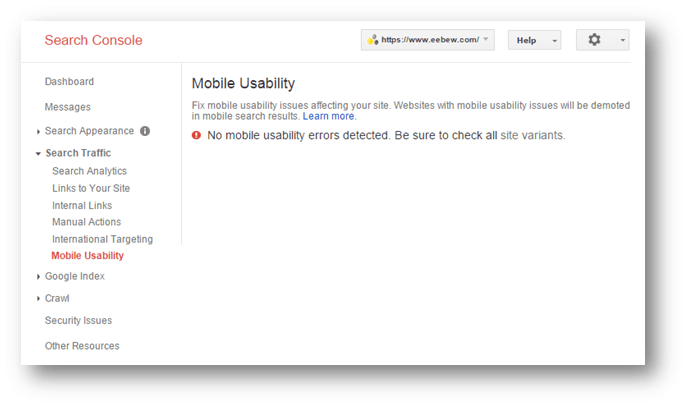
Mobile Usability
As smartphones are taking over the search market, it is necessary to provide mobile users ‘the best’ experience for surfing your website on mobile devices. For this reason, Google has created a feature called “Mobile Usability” which allows webmasters to analyze their website’s performance on mobile devices.
If Google spots any problem with your website’s mobile version, it will be reported in this section.
HTML Improvements
This is another remarkable feature of Google Search Console. HTML improvements section reports information regarding titles, meta descriptions and problems with non-indexable content on your website.

These were some of the best ways to use Google Search Console for your website.
Now that you have learnt them, it is time to implement these insights and reap some benefits.
Don’t forget to share your results and feedback with us in the comments below.
Happy Marketing ☺
Other Resources |
|
|---|---|
